Load Balanced and High Availability Setup
Smaller businesses that are just entering the world of EDI need a lightweight and easily configurable solution to integrate with their larger retail and healthcare partners, with a minimum of fuss. On the other side of this exchange, enterprise users are looking for a never-fail EDI solution capable of processing hundreds of thousands of daily EDI transactions. ArcESB is a highly scalable EDI solution that can be configured to support a wide variety of demands from small businesses, enterprise users, and everyone in between.
While a single instance of ArcESB will easily meet the needs of most users, high volume users will be pleased to find that ArcESB can be incorporated into more complex systems to accommodate more demanding business requirements for both transfer volume and system reliability. The following article will detail the configuration of ArcESB in high availability and load balanced environments.
When Should I Use a Load Balancing Setup?
ArcESB is an enterprise service application capable of processing a high volume of incoming connections, and ArcESB does so by making use of available system resources to process incoming requests and transfer outgoing messages. The available RAM, CPU speed, network bandwidth, and disk space on a machine can all be limiting factors to the maximum throughput that ArcESB can manage. When the volume of transactions processed each day reaches the hundreds of thousands, setting up a server farm is a more efficient solution than attempting to process all transmissions in a single endpoint.
The actual number of transactions at which deploying multiple instances of the application becomes more efficient may vary based on the particulars of your setup. Receiving transmissions requires a greater burden than sending them, and larger files will require more processing power than smaller ones. When you reach a ceiling for these resources, you should consider switching to a load-balanced distribution of ArcESB across multiple servers in a server farm in order to share the burden of processing your transmissions.
When Should I Use a High Availability Setup?
For most customers, this comes down to a question of the increased cost of setting up and maintaining an HA configuration compared with the risk of their EDI servers being down for hours or days. If you need to ensure maximum uptime even in the event that a network server resource loses power or otherwise becomes unavailable, you will want to create a high availability setup so that there is no single point of failure in the system that can result in an interruption of service. In this setup, a server farm will route incoming requests to a new node in the event of a failure in one of the other nodes.
What Are the Steps Involved?
ArcESB can be distributed in a load balanced or high availability setup through a few different ways, but there are two main objectives to accomplish when creating either setup:
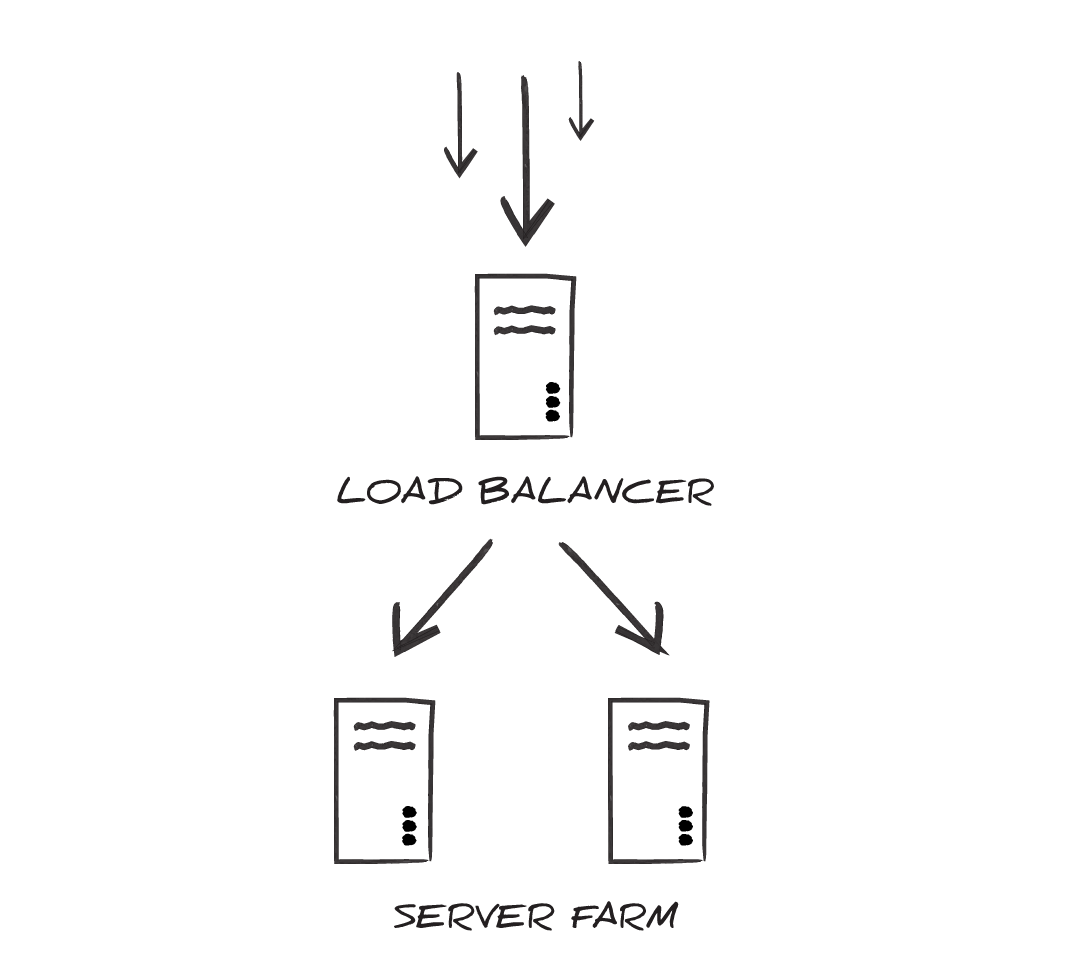
You will need to set up a web server farm and load balancer to distribute incoming traffic across multiple installations of ArcESB:
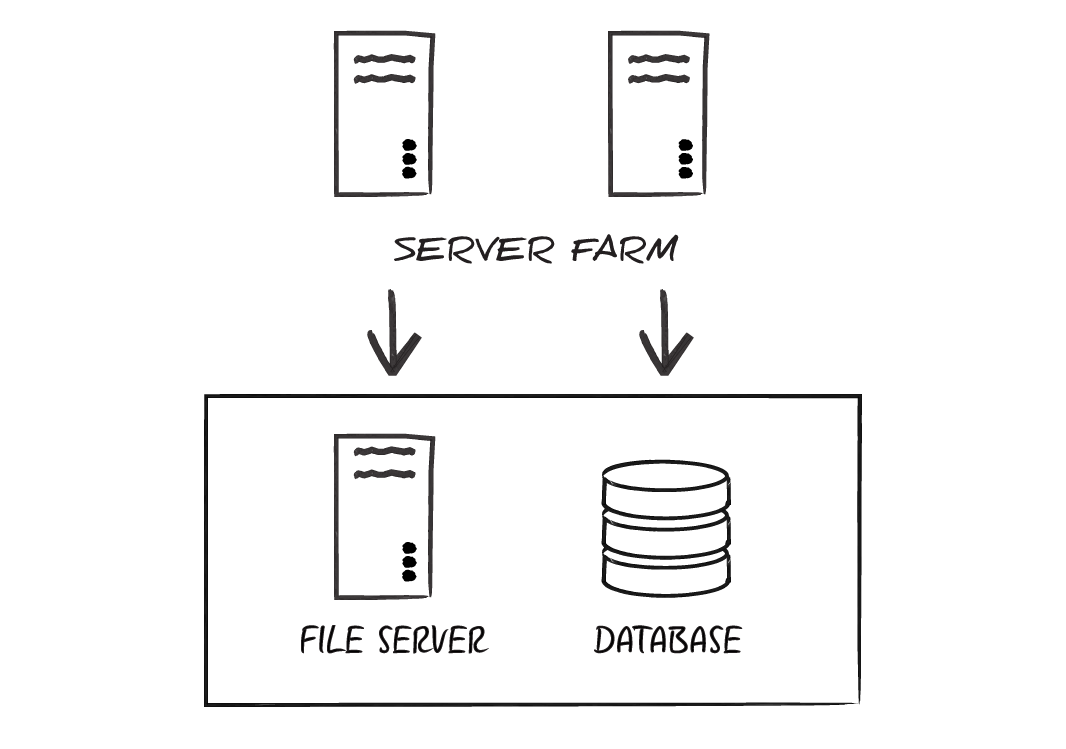
You will need to synchronize each installation of ArcESB in the server farm so that each application is working with the same data and maintaining the same logs:
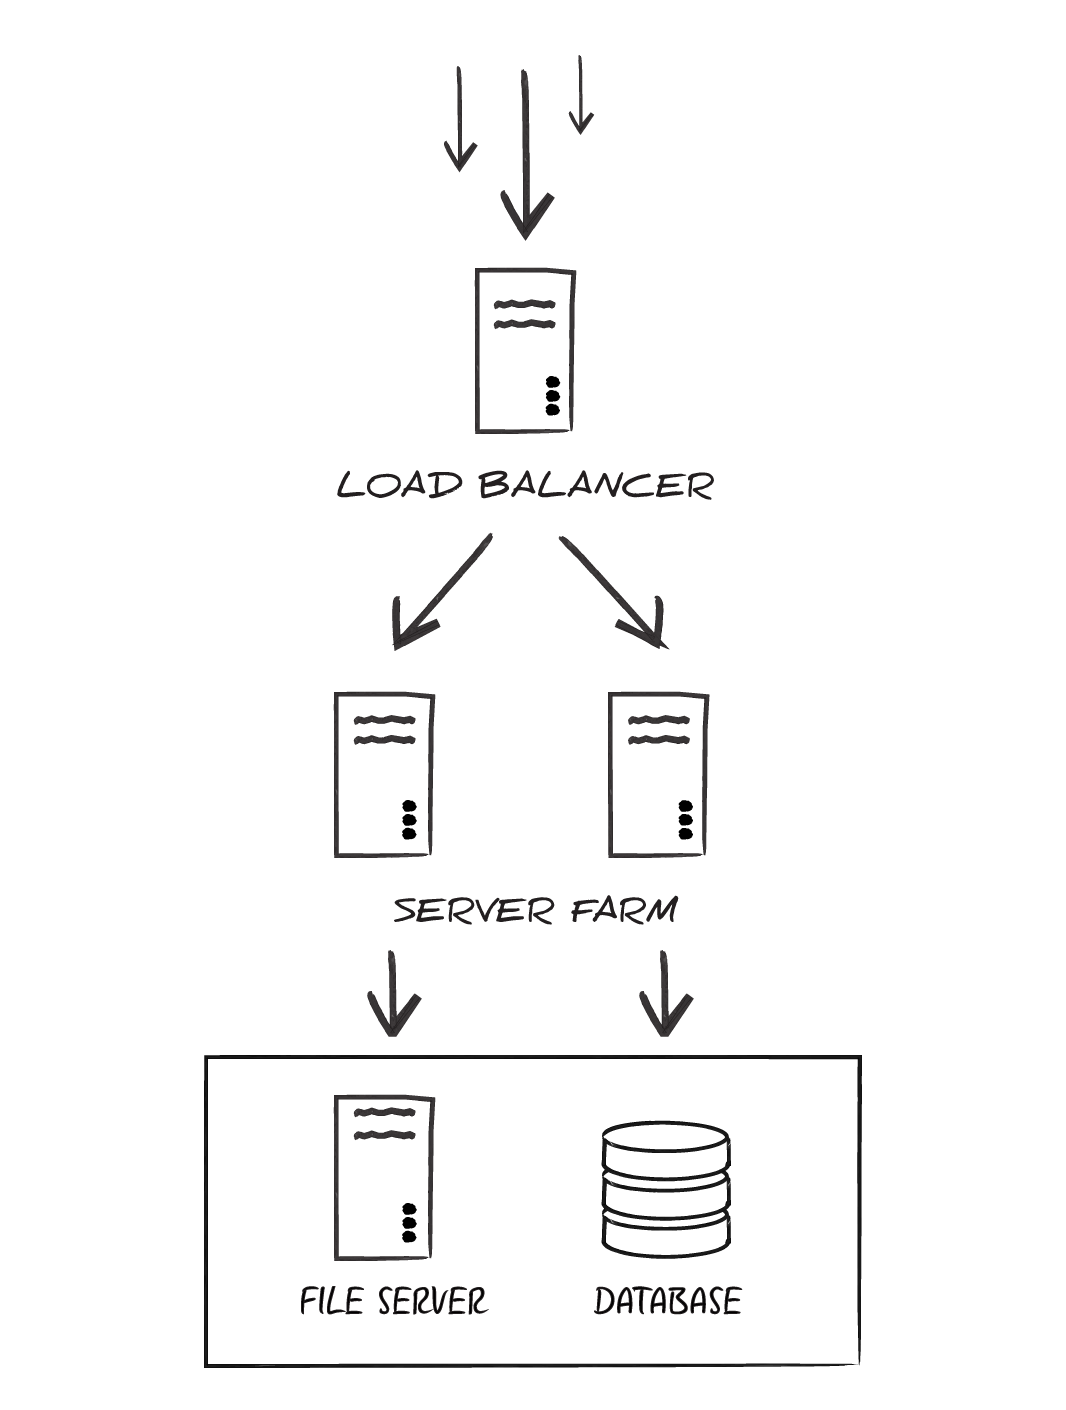
This article shows how to accomplish both:
Configuring a Server Farm and Load Balancer
There are multiple avenues available for setting up a server farm. These avenues depend on what web servers you are using to host the application. There are multiple options available for load balancing incoming requests as well. This article will focus on setting up a server farm of Web servers in Microsoft IIS (Internet Information Services) and making use of the Application Request Routing (ARR) feature of IIS to serve as a load balancer (This is IIS load balancing.).
To set up a Java server farm, refer to the clustering documentation for your Java Web Server.
Provisioning for Load Balancing
You will want to begin by allocating the machines that will function as the servers in your server farm. You will also want to allocate a server that will act as the load balancer with ARR. For your load balancing server, we recommend using a server running Windows Server 2012 or later. By doing so, you can take advantage of ARR 3.0.
Provisioning for High Availability
To synchronize the data from each of the servers in the farm, these servers will need to share filesystem resources. These servers will also need access to a shared database, so it is recommended that you use servers that are all members of the same domain. If your Web servers are not on the same domain, you will be able to load balance resources among them; however, you may not be able to successfully synchronize transferred files and logs among the members of the server farm.
Installing ArcESB on the Farm
You can find guides for deploying ArcESB as an IIS Web application or on several popular Java Web servers in our online help.
To install ArcESB on each server in the farm, you will need an individual license for each server in the farm; however, if you want to test this functionality, you can use the 30-day trial license of ArcESB for a first-time installation.
After configuring the server farm, the next step is to complete the ArcESB installation by setting up communication with your trading partners. For now, after installing ArcESB on the servers that will make up the server farm, configure the server farm by installing the ARR feature on the server that will act as the load balancer.
Configuring Application Request Routing
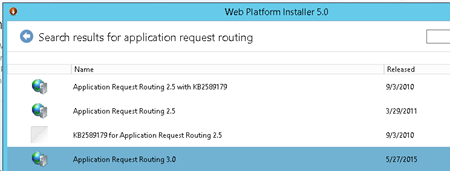
Application Request Routing (ARR) is an optional feature of IIS that you can obtain from Microsoft through their Web Platform Installer. Download the Web Platform installer and search for the ARR 3.0 feature like so:
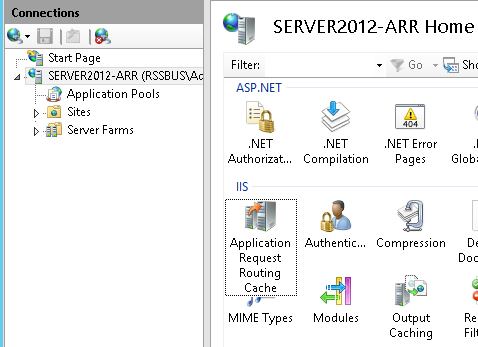
When you complete the installation of the ARR feature, you will see a new module in IIS that you can access from IIS Manager and a new Server Farms section under the Connections menu in IIS Manager:
Creating the IIS Server Farm
To create a server farm in IIS, follow the steps below:
- Select the Server Farms entry under the Connections pane.
- Select Create Server Farm under the Actions pane.
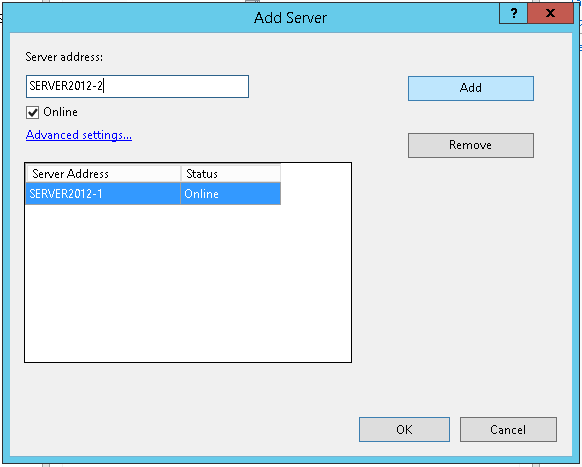
- You will be prompted to name your server farm, after which you will be allowed to define individual servers to be members of that farm. You can add new servers by their network name or IP address as long as the server can be reached on the network where your ARR server resides:
- Once you have configured each machine in the server farm, you will be able to manage the server farm by selecting the entry under the Server Farms section in Connections:

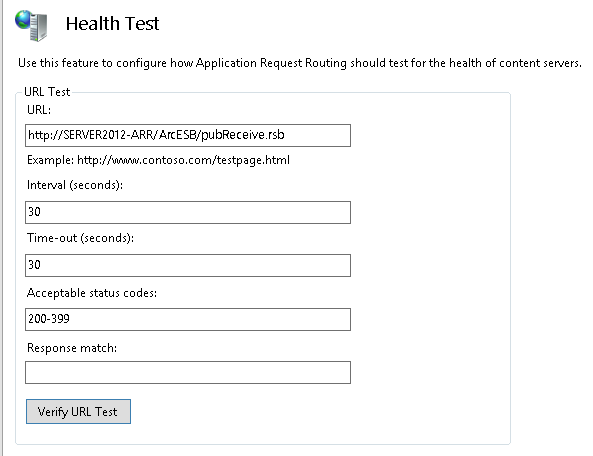
In the Health Test menu selection, you can configure a URL on which to test the health of each machine in the farm.
The receiving URL, where ArcESB receives incoming transmissions from trading partners, is the best URL to use to see if the application is alive. This URL can be obtained from your personal profile, which stores the information your trading partners need to contact you.
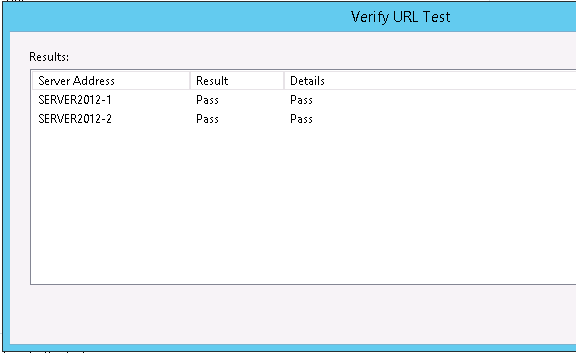
- By clicking Verify URL Test, you can quickly check the health of each node in the farm:
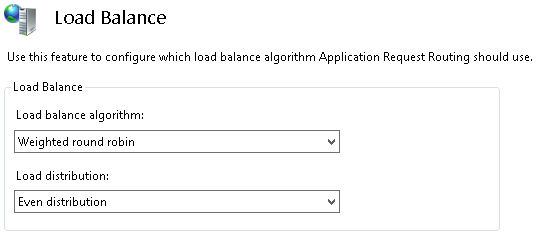
- From the Load Balance menu selection, you can control how to distribute incoming requests. If all of the machines in your farm are healthy, it is recommended that you use the default "weighted round robin" method of distribution:
Synchronizing Multiple Installations of ArcESB in a Server Farm
At this point in your installation, you should have multiple distinct installations of ArcESB that are being served in a web server farm. You can continue to the next steps if you wish each instance of the application to manage its own resources separately.
If you want to synchronize multiple instances of ArcESB, note that ArcESB interacts with the local system in two important ways:
- A data folder is used by the application to store necessary file resources used by the application. This includes configuration files for your local and connector configuration profiles, any certificates used by the application, the messages that are processed by ports, and log files for attempted operations.
- A database used by the application to store information about the status of processed messages, application and diagnostic information recorded by the application, and access logs.
In order to share these points of interaction with each instance in your server farm, you will need to override the default Application Directory (which includes the data folder) and Application Database in each instance of ArcESB. Each instance of ArcESB should have the same directory set as the Application Directory and the same database set as the Application Database.
In the .NET edition, the location of the data folder and database can be overridden in the application's Web.config file. Likewise, you can integrate a Java Web server by setting the environment variables discussed below.
Note: In order to ensure that your file server and database do not act as a single point of failure on the system, you will want to point to a file server and database that are themselves designed in an HA configuration.
Using a Shared Application Directory Across Multiple Instances of the Application
The Application Directory can be configured in the server configuration file.
Windows/.NET
In the \www folder in the application installation path, the web.config file determines the application configuration settings that are loaded by the application at runtime. At the bottom of this resource, you will find a commented section that references an AppDirectory key in the appSettings element:
  <appSettings>
    <add key="AppDirectory" value="\\FILESERVER\ArcESB\data" />
  </appSettings>
This setting can be changed to point to a shared folder on the filesystem that you have network access to. Once configured, any new partners that are added in ArcESB will be created in this folder.
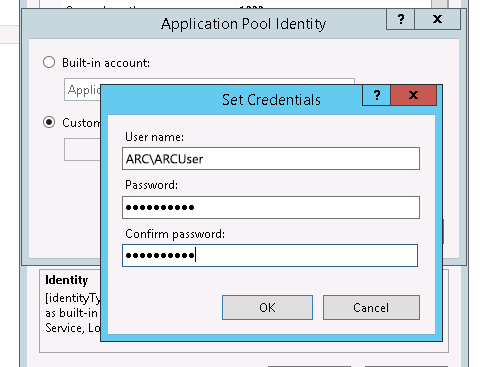
Please note that to use a UNC path in this manner, you will want to assign the application pool that is hosting ArcESB to use a domain user account with permissions to the path as its identity.
You configure the application pool when you deploy to IIS. To change an application pool identity, do the following:
- Expand the node for your site in the Connections Panel and select Application Pools.
- Right-click your application pool and click Advanced Settings.
- In the resulting dialog, click the button in the field next to the Identity property.
To specify an existing account, select Built-in Account. To specify a new account, select Custom Account and then click Set. Enter the credentials for a domain user account.
Linux/Java
The Java edition of ArcESB will check for the presence of an AppDirectory environment variable to determine the network path on which the application's data folder is hosted. It is also possible to set this variable through a startup.sh script. Further, you can also define the variable in the server options for the Java app server. For example, to declare the variable for the "arcesb" application in Tomcat, you would add a new Context entry for your application in the Host section of the server.xml for the application:
    <Host>
        …
        <Context path="/arcesb">
            <Parameter name="APP_DIRECTORY" value="//FILESERVER/arcesb" override="false"/>
        </Context>
    </Host>
Using a Shared Database Across Multiple Instances of the Application
A distributed ArcESB deployment should use a shared database that governs where the application stores information on the transactions processed through ArcESB, including application error and access logs maintained by ArcESB.
Windows/.NET
The web.config file in the 'www' folder also includes a commented section that references an AppDb key in the appSettings element:
  <connectionStrings>
    <add
      name="AppDb"
      connectionString="server=SQLSERVER_LOCATION;database=DATABASE_NAME;uid=USER_ID;password=PASSWORD;"
      providerName="System.Data.SqlClient"
      />
  </connectionStrings>
This setting can be changed to point to a network database server, such as SQL Server, by replacing the connection string details with a valid connection string for the database. Once configured, any new transfers that are initiated through ArcESB will be added into the appropriate tables in these logs. The corresponding tables will be created in the database if they are not already present.
Linux/Java
The Java Edition of ArcESB will check for the presence of an APP_DB environment variable to determine the connection string for the database that ArcESB will use for storage. Both SQL and MYSQL servers are supported in the Java configuration.
It is also possible to set this variable through a startup.sh script or to define the variable in the server options for the Java app server. For example, to declare the variable for the "arcesb" application in Tomcat, you would add a new Context entry for your application in the Host section of the server.xml for the application:
    <Host>
        …
        <Context path="/arcesb">
            <Resource name="jdbc/APP_DB" auth="Container" type="javax.sql.DataSource"
               maxActive="100" maxIdle="30" maxWait="10000"
               username="USER_ID" password="PASSWORD" driverClassName="com.mysql.jdbc.Driver"
               url="jdbc:mysql://MYSQL_LOCATION:3306/DATABASE_NAME"/>
        </Context>
    </Host>
Next Steps
Your ArcESB deployment is now ready to start distributing requests. The next steps are to set up communications with your trading partners and to link ArcESB with your EDI processing. Your trading partners will reach you through information you provide in your personal profile. Your trading partner profile is tied to a connector used for processing.
Other tasks for a distributed deployment include exporting profiles to each instance and routing asynchronous MDNs (message disposition notifications) successfully back to the originating partner. See the KB for videos and guides.
Ready to get started?
Learn more about ArcESB or download the free single-connector license:
